How to Fit a Contact Microphone to a HarpThis article explains how to fit a small contact transducer pick up microphone such as the Scherter Basik Pick Up to a harp.
The first decision is whether to mount the pick up on the inside or outside. Here’s where the compromises begin. Not many people want an unslightly pick up (they are called bugs for a reason) attached to the front of their beautiful harp. Attaching it more discreetly to the side or back can be an option, but only if you can find a place where there’s no chance of it being knocked by arms, knees or legs whilst in the full flight of creative expression. For these two reasons, most people end up attaching the pick up to the inside of the harp, where its hidden from view and out of harm’s way. 1. Sound Quality Now let’s get a good sound. In general, the pick up will sound better towards the top of the harp. This is because the bass end of the harp tends to sound boomy when amplified, so you want to avoid enhancing this effect by placing the pick up over the bass end. The low frequencies of the bass will get picked up in the higher end of the harp too, so, while it may seem that sticking the pick up at the top end of the harp would result in a overly treble sound, the reality is that the sound is relatively balanced. Of course, as with everything to do with mounting a pick up, let you ear be the final judge and if the harp does sound too trebly and tinny, move the pick up down slightly. 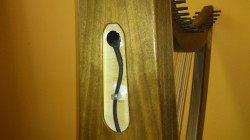 Choose a position near to the top of the harp, attach the pick up temporarily with putty or a thin strip of gaffer / duct tape, connect to the amplifier and see what it sounds like. You may get the best sound by adjusting the EQ on the amplifier to reduce the bass frequencies. If you don’t like the sound, don’t be afraid to move the pick up and try again: the difference in placement of a few centimetres can make a huge difference to the sound. It really is a time for experimentation. Finally, be aware that some strings have a more pronounced resonance than others. This may not be noticable in every day acoustic playing, but once the harp is amplified, all the little quirks of the harp are, well, amplified! You are aiming for a good sound that is as natural as possible, and is balanced, both between the higher and lower frequencies and also between the volume/presence of the individual strings themselves. Once you have a good sound, its time to attach the pick up. Here you need to decide whether you want the pick up to be attached permanently or semi-permanently. If you think you may need to remove the pick up in the future, then you will need to use putty or double sided foam tape. If the pick up can be mounted permanently, then you have the option to use a glue such as superglue. According to Ray Mooers of Dusty Strings, pick ups should be attached with glue whenever possible, as it is contact with the wood’s surface that allows the microphone to pick up the most natural and resonant sound. If however, you anticipate the need to remove the pick up in the future, putty or double sided foam tape is a good compromise. Be sure to attach the pick up securely. 2. Accessibility, Playability and Aesthetics However, before you permanently attach the pick up, you need to consider whether that sweet spot it took you so long to find, is going to cause any problems. The first thing to consider is whether you can easily access the pick up in order to get the lead in or out. Are you stressing the connecter by having to approach it from an angle? Are you at risk of pulling the pick up off when you remove the lead? Can you reach it at all? Even if none of these things are a problem, think about what happens to the amplifer lead further down? If your pick up is mounted inside the harp’s soundbox, where does the lead come out? Is it going to flap about or get trapped by your body as you play the harp? Remember that any knocks on the lead will sound VERY LOUD when amplified. 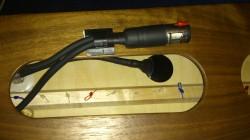 Some pick ups come with a pre-amp attached. If so, this is where the amplifier lead is connected. A pre-amp is usually positioned along a cable several centimetres away from the pick up, so you need to find somewhere else to mount this. As with the lead, you definitely don’t want this to move about or be in any danger of knocked. You could use a plastic mount to keep the pre-amp stable. Same considerations apply: attach the pre-amp mount somewhere out of the way where you won’t knock it, but where you can easily access it. Many people choose to mount the pick up inside the harp and the pre-amp somewhere discreet outside, on a part of the harp that won’t come into contact with the player’s body. A good choice can be the base of the harp – but if you are putting the pick up on the bottom of the harp make sure that it still stands up! Also, if your case is a tight fit, just check that you can still get the harp in its case with the pre-amp mount attached! 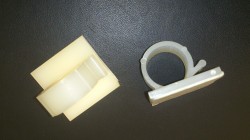 So there you are. You should now have a pick up (and pre-amp) mounted in a position which has a good sound and which allows you to play comfortably, without fear of amplified knocks and bumps. Hopefully, it will look good too! Enjoy. |